

Material Mixing and Layering Systems in Octane:
Technical Deep Dive
Note
This guide is meant to be used in conjunction with the Mixing and Layering Systems in Octane Stepthrough guides. There’s one for Octane Standalone and one for Octane for Cinema 4D.
This is more of a nitty-gritty reference doc that allows you to look up specific information, where the Stepthroughs are a step-by-step project based approach to help you see all the various systems in action.
Introduction
The Octane material system is extremely robust and can be as simple or as complex as you need it to be. In this guide, we’re going to go through the anatomy of a material, and then all of the various ways there are of mixing and masking textures, layers and materials.
The DCCs (host apps like Maya or C4D) implement the material system in different ways due to how the app handles its native materials and nodes. This guide will focus on the material system as it exists in Octane Standalone, and sometimes point out differences in Cinema 4D. If something doesn’t work as expected in your DCC, consult the documentation to see how it’s implemented.
Part I: TL;DR
As with all of these guides, sometimes you just need a quick refresher. This section is a summary of Part III: Mixing & Masking Methods. If you’re new to this, just skip this section for now and move to Part II: Common Concepts.
When to use what:
- Use a Mix Texture node to quickly combine together two images using a mask. This texture will then be fed into a channel of a material.
- Use a Composite Texture node for more complex combinations (including blend modes) of two or more textures. It’s a more versatile version of the Mix Texture node.
- Use the other operator nodes (Add, Subtract, Multiply) for a quick and dirty two-texture blend mode and don’t want to bother with a Composite texture.
- Use a Mix Material to quickly combine two materials via a mask.
- Use a Composite Material to combine several materials via masks - it’s a more versatile version of the Mix Material.
- Use a Layered Material for very complex materials where you want to overlay multiple types of specular and sheen effects on the same surface. Use this rather than a Material Layer input if you want the freedom to easily swap base materials out in addition to material layers.
- Use the Material Layer input on any material if you want to add a quick layer or three over the top of an existing material. This input may need to be turned on first in some DCC plugins. This method is a little cleaner and faster than the Layered Material, but it takes some work to edit the base material, and there’s an extra step of adding layer groups to get multiple layers.
- Use a Universal Material rather than a material layer if you only need one layer of sheen or coating over the top of an existing material, since those channels are already built in.
Part II: Common Concepts
Even though there are a lot of paths toward getting a look you want, all of these build off a few core concepts. Once you get these solidified in your brain, everything else should fall into place quickly.
Anatomy of a Material
A material is a single package that’s applied to a mesh that contains a whole bunch of data and attributes that describe how it looks and what happens when light bounces off it, goes through it, or is emitted from it. Octane has several types of materials (diffuse, glossy, specular, metallic, universal, and a few other special ones).
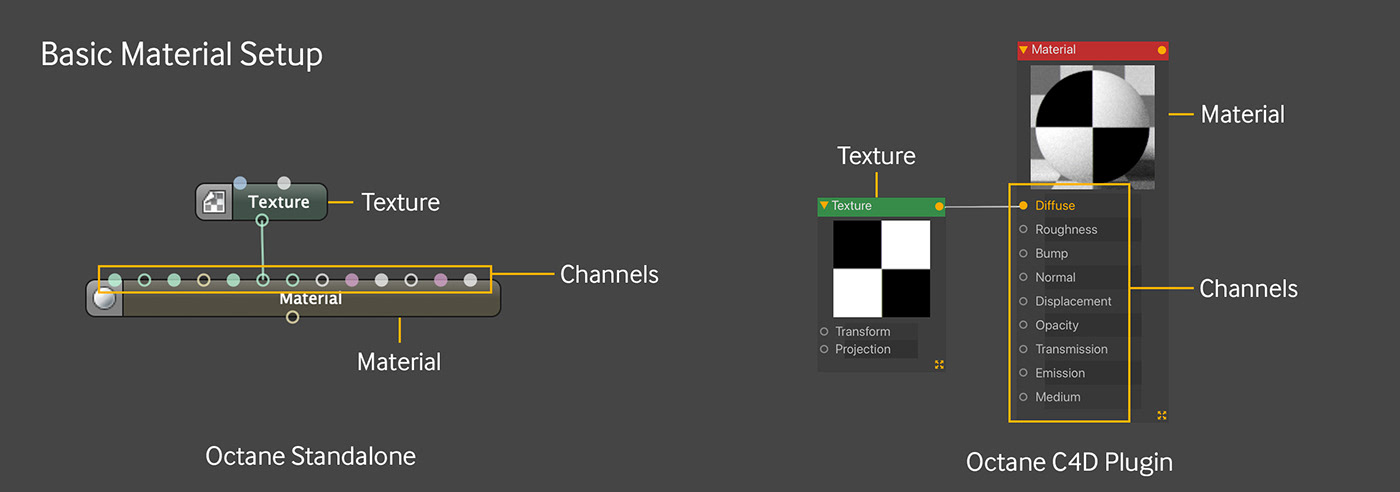
A material is divided into channels (Albedo, Roughness, Transmission, Specular, etc.), each controlling a different property of the material. The different material types in Octane have different sets of channels. Some channels like Roughness are found in nearly all the material types, where others like Metallic are only found in a few. The Universal material type contains all of them, and is often the best choice for experimenting with various effects.
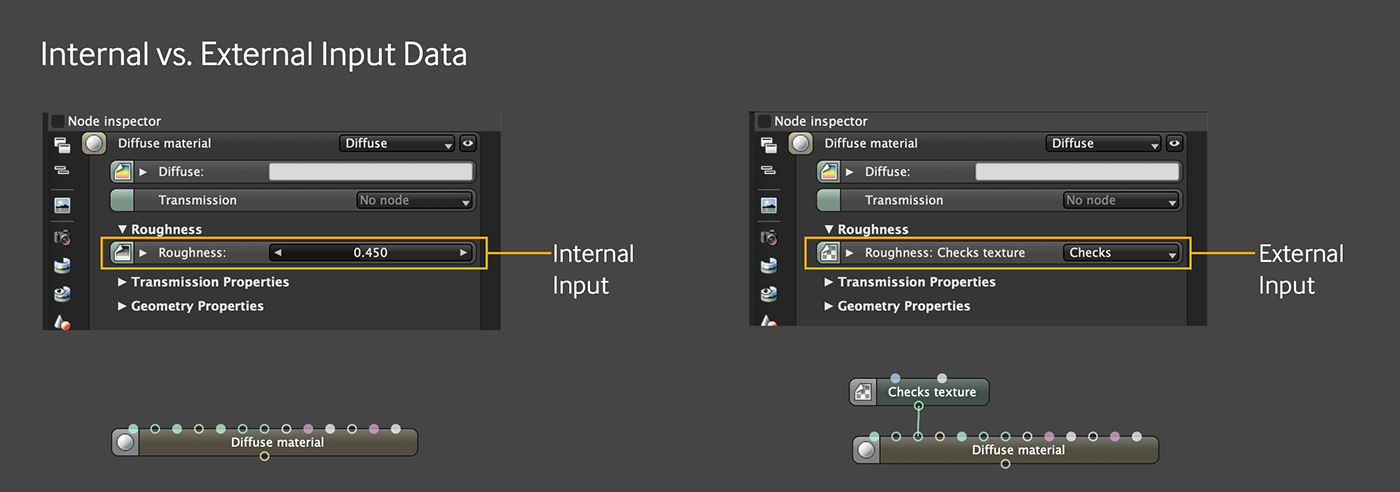
A channel needs some sort of input data to tell the material how strong the effect is, and how it’s distributed. Channels can store this data internally (you adjust it using the Node Inspector) or externally (you pipe in another node into the channel’s input that overrides the internal data).
This input data - often called a texture - can be something as simple as a 0-1 grayscale slider that adjusts how strong the effect is across the whole material. It can also be something procedural like a gradient, so the effect is stronger as it goes along one axis. In a lot of cases, it’s a bitmap image. Some channels take color data like Diffuse, others only take grayscale data like Bump. Textures do different things depending on what channel you put them into. Some DCCs embed certain inputs by default while others need external nodes for everything.
A material can also contain material layers, which is essentially a subset of channels. These layers can be stacked on one another, and the effects of the specular and sheen channels add up rather than override the ones below it to make a more complex material. A material layer node can’t be directly applied to a mesh - it has to be fed into a Material Layer channel in any material type.
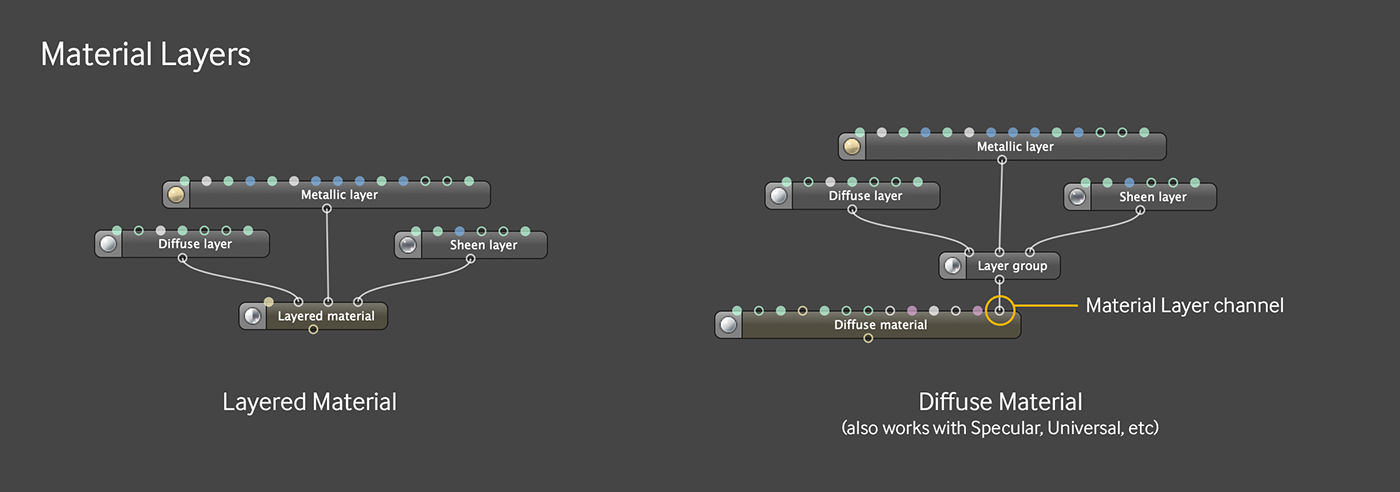
In the Layered Material type, you can add up to 8 layer inputs. If you need more than that, you can add a layer group which will give you eight more inputs.
In any standard material type (Diffuse, Specular, Universal, etc.), there is one single material layer channel. In order to use multiple material layers, you have to start with a Material Layer Group node (or a material layer node set to the type “group”), and then connect your other Material Layers to that. You can chain together groups to get as many layers as you need.
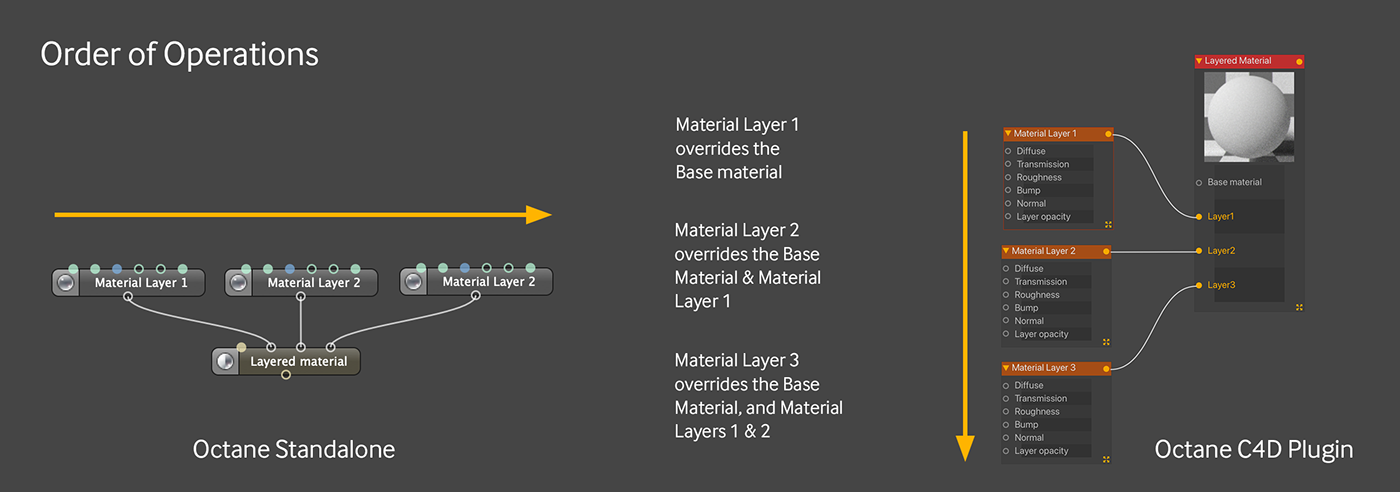
Channels within a material, material layers, and the various mixing constructs all have a specific order in which they work. In the node inspector, the order goes top to bottom. The nodes in the node graph editor either go left to right like in Octane Standalone, or top to bottom in some of the DCCs like Cinema 4D.
This means anything at the very top (or left) will be the base, and then everything below it (or to the right of it) will affect the prior layers in the stack.
The direction is a bit of a departure for a lot of artists who are used to drawing and painting applications where layers on the top affect layers beneath them, but for programmers and people who have used 3D apps for a number of years, it’ll make sense since code usually executes top to bottom, left to right.
As with every rule, there’s always at least one exception :). The Composite Texture node (introduced in version 2020.2) works more like 2D compositing programs where the base layer is on the bottom and each layer overrides the ones under it. In Octane Standalone this also means the order goes right to left in the nodegraph editor.
Masks
What is a mask?
Most artists should be familiar with this concept already, since it’s found in pretty much every 2D art and design app, and even in traditional media (think masking tape or a stencil). Simply put, it’s how Octane determines how much of an effect one layer has on the previous layers.
Masks in Octane are always grayscale. If there is color data in the mask, it’ll be ignored. This data is either in the form of a bitmap image, or it’s procedurally generated.
How does a mask work?
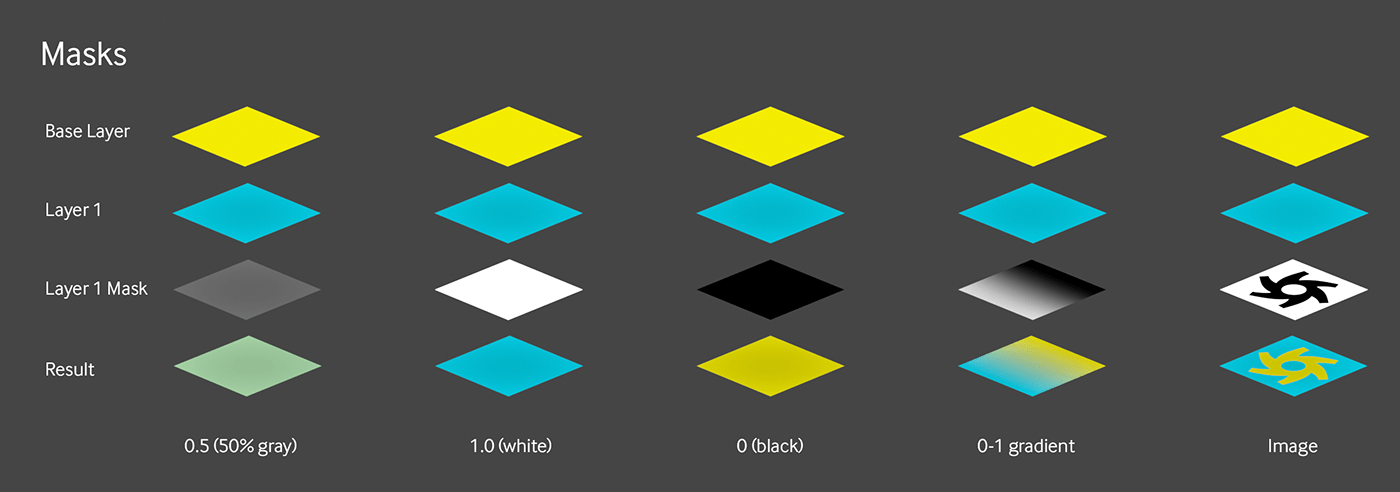
Masks work on a scale from 0-1 (0-100%). This should be thought of as “strength” rather than color. It’s visually represented by shades of gray so that you can see what’s going on, but those grays are mapped to the strength of the effect, not actual gray color data.
A strength of 0 is visually represented as pure black. Any part of the texture, channel, layer, or sub-material mapped to a part of the mask with a value of 0 will have no effect on the overall material. Have a look at the example above - if a diffuse color channel in a material is blue and it has a fully black (0) mask applied, no additional blue will be added to the appearance of the material from this channel.
A strength of 1 is visually represented as pure white. Any part of the texture, channel, layer, or sub-material mapped to a part of the mask with a value of 1 will be at full strength. In our blue example, if the base diffuse channel is yellow, and the mask on the blue diffuse layer is all set to 1 (white), this will completely override the yellow color and the material will appear blue.
Any strength between 0 and 1 will mix the layer with the prior ones. 0.25 means 25%, 0.5 means 50%, etc. In our example above, if the base diffuse layer is yellow, and the mask on the blue diffuse channel is at 0.5, the material will evenly mix the yellow and blue and you’ll end up with a green material.
Masks of course don’t have to be entirely one value, and most of the time won’t be. If a mask has black and white stripes, everything mapped to the black stripes will have no effect and everything mapped to the white stripes will affect those parts of the material 100%. If this mask is applied to a diffuse color, you’ll end up with colored stripes. If it’s applied to the Specular channel, then there will be alternating glossy and matte stripes on the material.
How is this applied in Octane?
In a material, when a channel has a 0-1 slider (sometimes called “float” in the DCC implementations), that 0-1 value is actually a built-in mask. Depending on the material type, it either usually defaults to 1 (white) or 0 (black), and then as you move the slider one way or the other, it changes the strength (grayscale value) of that entire layer.
Most of the time you can override this by running another node - which now acts as the mask - into the input pin for that layer. That node can either be an image (like a photo or a pattern), or procedural (like the checkerboard or noise). This source node masks the layer it’s applied to based on the grayscale values that it generates.
Mask inputs are called different things in the different places you can use them. The pin might be called “amount”, or “layer mask” or “layer opacity”. In the Mixing Methods section, we’ll go over where the mask goes in each method.
Blend modes
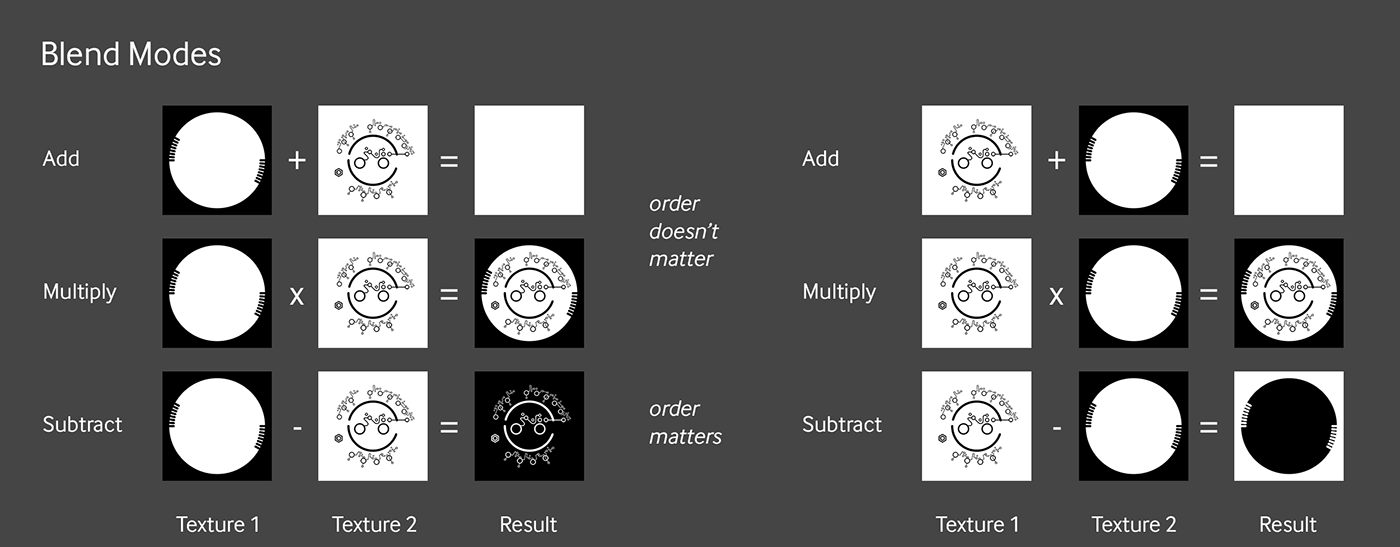
Blend modes tell Octane which calculations to use to merge the pixels of two layers together. Most of the time you’ll be using the “Normal” Blend mode, which assumes that an image further down the chain in the order of operations is 100% obscured by one further up the chain until a grayscale mask is applied to let the system know how much to obscure it.
Other blend modes use more complex math to merge the pixels together, and it can give really interesting and unexpected results. More information about blend modes can be found here.
Since it’s math, the order of operations for some calculations like add and multiply do not matter, since A+B = B+A, and A*B=B*A. In others like subtract, it very much does, since most of the time A-B does not equal B-A.
Blend modes are found at the texture level. Up until recently, you had to use a special node like the Multiply Texture or Add Texture nodes to get these effects, but the Composite Texture node introduced pretty much every blend mode you can think of and more.
UVs and Projection
This is kind of out of the scope for this guide, so we’re going to try to keep it brief here. This is important to understand so you don’t end up with labels freaking out and splitting across random surfaces or parts of textures scaling or warping in weird ways.
It’s highly recommended that you find resources on how to properly UV map a mesh using your DCC or external application of choice.
Projections

A 2D texture is mapped to a 3D polygon mesh using some type of projection. It might help to think of it like a number of actual projectors displaying images on the surface of the object. Box (or cubic) projection would be like six different projectors, each one projecting the same image flat on the front, back, top, bottom left, and right of the mesh. Works great if your geometry is a box or has flat sides, but once it starts having angled cutouts or curves, the texture will distort.
Basic projections like Box, XYZ to UVW (flat), Spherical, or Cylindrical are fast to set up, and they work well on small, or very simple parts of a model (or with materials where distortion doesn’t really matter). Once your geometry gets more complex, the projection method has to as well.
In Octane, each texture within a material can have its own projection, so if you have a scratch or smudge map, or something abstract, you may be able to get away with one of the simple projections (in combination with the Transform node to line it up) and just not worry about whether it distorts. If your texture contains text, a very regular pattern like a checkerboard, or something else that will be very noticeable when distorted, and the geometry you’re trying to project it on is complex, you’ll likely have to move to a more robust projection system like Triplanar or Mesh UV. Triplanar is fast and powerful in a lot of cases - it’s sort of the middle ground between basic projections and Mesh UV and is worth learning about.
Mesh UV Projection
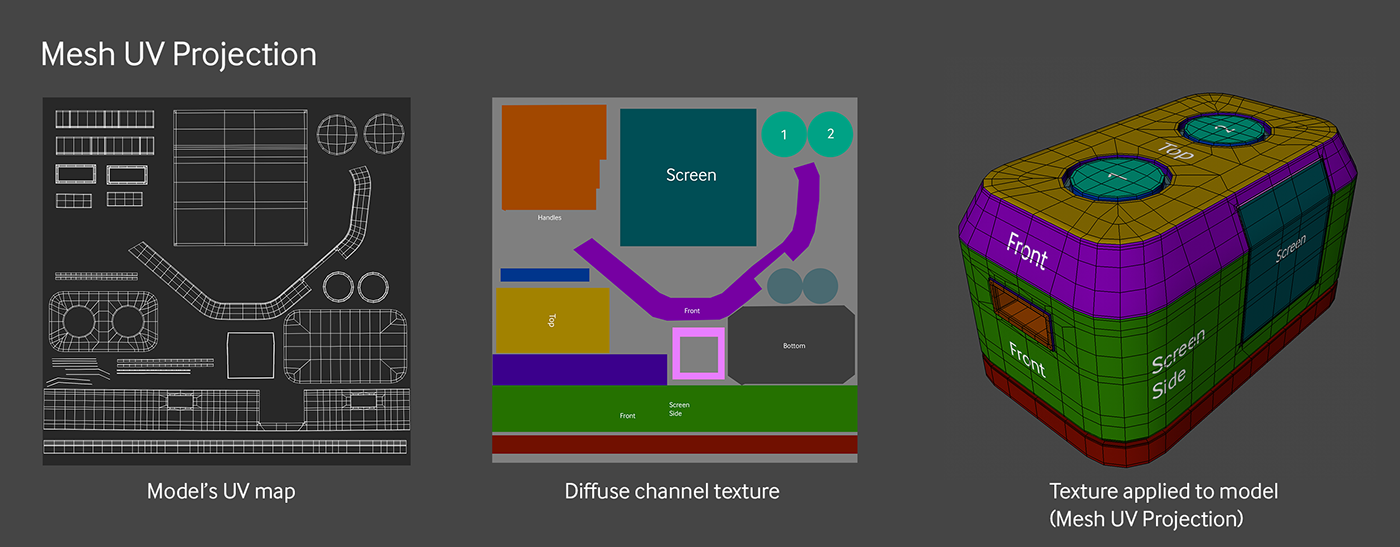
The most common projection for complex geometry is Mesh UV. Rather than try to conform a ton of different projection angles to the model, every polygon that makes up the mesh itself is “unwrapped” and laid out flat in a square. This is called the UV Map.
Once the mesh is unwrapped, you just need one single square texture projected over the top of this square UV map, and when it’s wrapped back up around the mesh in 3D, the texture nicely goes with it and there’s no distortion.
Unfortunately it’s not as easy as it sounds, and the unwrapping is an art unto itself that very much depends on the geometry, how it’s going to be used, and how the textures will be generated.
Again, we encourage you to learn more about UV mapping and run through some tutorials in how to do it in your DCC of choice (or an external app like Rizom). Just know if your textures are distorting or acting crazy, the projection is probably the issue.
Part III: Mixing & Masking Methods
Now that you have a basic understanding of how the material system is laid out, it’s time to get into the different mixing and masking methods. This can happen at the texture level, the material level, and the layer level. Going forward we’re just going to refer to this as mixing, because “mixing and masking” is kind of a mouthful.
There’s a lot of overlap between the different methods, and no one right or wrong way to do this. As you make more materials in your DCC, you’ll start to get a feel for the advantages and disadvantages of each for any particular use case.
Texture Level
Mixing at the texture level is good for fine-tuning a single image or map that you can feed into one or more channels. Most of the time you’ll probably be mixing here to generate complex masks that you want to act as a single texture to affect some other property of the material.

Some examples
- Overlaying one pattern on top of another to form a more complex pattern that gets fed into the Albedo channel of a cloth material.
- Multiplying together two scratch textures to make the scratches more varied and interesting, and feed that into both the bump and roughness channels of a metallic material
- Masking off a portion of the texture where displacement will occur. Note: in order to use a mixed material with displacement, it must be run through a Baking Texture node first,

Mix Texture Node
The Mix Texture node is the simplest and easiest way to mix two textures. Remembering the order of operations from earlier in this guide, you put your base texture into the First Texture input, and the texture you want to overlay into Second Texture input. The Amount slider (0-1) is the built-in grayscale mask that kind of acts like an opacity slider in a 2D art app.
You can pipe a texture or other procedural node into the Amount pin which then overrides the built-in 0-1 slider and becomes the new mask.
You can only mix two textures together using a Mix Texture node. If you need to mix more textures together, you can just make another Mix Texture node and run the output of one into the First Texture input of the other, and use a different mask in the Amount input for that second node. You can link as many as you want together that way, but if your chain starts getting complex, it’d be worth looking into the Composite Texture node for a cleaner and easier way to merge several textures.
The Mix Texture node has no blend modes, so it’s really only for simple masking and sometimes blending together if you really just want a basic opacity slider.

Composite Texture Node
This new node (as of Octane Render 2020.2) removes the two-texture limitation of the Mix Texture Node and allows you to mix together multiple materials using various blend modes. This node works similar to 2D compositing applications, and as mentioned before, the order of operations here is bottom-to-top/right-to-left rather than top-to-bottom/left-to-right like the rest of the systems covered in this guide.
In the above example (shown in C4D because of the thumbnails), The base layer (layer 1 at the bottom) is a polka dot pattern. The maze pattern is then multiplied on top of it to constrain it to just the insides of the dots. Then the pink-to-blue radial gradient is layered over the top using the Pin Light blend mode, and finally the C4D Mod Noise is blended into the whole thing using the Color Burn blend mode.
Other Operator Nodes
The Add texture, Multiply texture and Subtract texture nodes take two images and use a single blend mode per node to merge them together. You can get the same effect by running two images into a Composite Texture node and choosing the Add, Multiply or Subtract blend mode. These are fast great if you know you just want that one effect, but not so great if you’re experimenting.
There are other ways of blending textures together based on certain parameters using the Comparison node or procedural maps like Falloff and Triplanar. These are out of scope for this guide, but it’s worth knowing they exist.
Material Level

Mixing at the material level gives you more control over multiple channels at once. It’s good if you want to have a few very different surfaces in the same material, each with their own specular, metallic, bump or normal properties. Each material OVERRIDES the material further up in the stack unless your mask has grays in it, in which case it just blends it together the way an opacity slider would in a 2D app which usually doesn’t end up looking very realistic. This is very different from layering, which we’ll cover in the next section.
Some Examples
- A mosaic with four or five different types of tile.
- A piece of stone that has veins of gold or some other metal going through it.
- A glossy plastic with emissive inserts and a metal ring at the bottom.
- A brick facade with metal-rimmed windows.

Mix Material
The Mix material was originally the only way to combine two entire materials. It works very similarly to the Mix texture node and has the same limitations. It’s still great for quickly and cleanly putting together two materials, but any more than that and you’ll want to consider the Composite Material instead.
The implementation of Mix and Composite materials varies between DCC Plugins - Consult the documentation for your plugin to learn about the specifics.

In Octane Standalone, create a new Mix Material node. From here you have two options:
1. Select a material type for both the First material and Second material slots in the Node Inspector, and build your materials there. This allows for a cleaner node graph, but your materials are stuck there permanently and can’t be repurposed if you decide later that you want to convert this to a Composite material or use one of the new materials for something else.
2. Create or import two materials of any type and connect them to the First material and Second material pins. As soon as you connect one, it will override the embedded material in that slot. This method is a lot more versatile.
Once you’re done making materials, either use the built-in 0-1 Amount slider to blend the materials together like an opacity slider, or pipe in a texture or procedural node to use as a mask in the Amount input.
In Cinema 4D, create a new Mix Material. Open the Node Editor for it and drag two other materials into the graph.
Note: These will be links to the materials, not copies, so anything you edit here will also be edited in the original material.
Plug them into the Material 1 and Material 2 ports of the Mix Material node, and then either use the 0-1 Float Texture slider to blend them together, or run a different texture or procedural node into the Amount slider to control the mask.

Composite Material
The Composite Material (formerly known as the Blend Material) is a more versatile version of the Mix Material. You can have a nearly limitless number of materials - each with their own masks - all mixed together in a single node rather than having to chain several together like with the Mix Material.
When working with the Composite Material, the nodegraph can get a bit crazy. It helps a lot to use Octane’s grouping system to compress down each material input to keep things tidy. In Octane standalone, you can go into a group in another tab to make changes. In other implementations, you may need to ungroup a material to edit it again.

In Octane Standalone, you can once again either embed materials directly into the node using the Node Inspector, or pipe in external materials into the Composite Material’s inputs. You then add a Material mask into the slot that corresponds with the material you wish to mask. For example if you make Material 1 a blue diffuse and Material 2 a red diffuse and you want to blend them 50/50, you’d use the mask for Material 2 (not Material 1).
One key difference between the Composite and Mix materials is that you can now embed masks as well as link them. There’s no more built-in 0-1 Amount slider. To get this functionality back, you can simply use a Grayscale Color node as the mask and it will work the same way as the Mix Material (basically like an opacity slider).
Embedding masks has the same advantages and disadvantages as embedding materials - it keeps the node graph a little cleaner, but you can’t reuse the mask across multiple materials or elsewhere in the node graph if you wanted to and there’s no way to extract them once you build them within the material.

In Cinema 4D, create a new Composite Material. Unlike Octane Standalone, the C4D implementation requires you to use submaterials rather than normal materials for each input.
You can create submaterials directly from the node inspector for the Composite Material. You also have the option to drag materials in externally like you did with the Mix Material, but you have to convert that copy of the material to a submaterial. This is done by right-clicking the material you dragged in and choosing “Convert to Submaterial”. The translation may not be perfect, and it might require some rebuilding, but it’s easier than starting from scratch.
You can’t convert back from a submaterial to a standard material, so it’s important to do a little planning before you start making a material, and commit to the composite material if you’re going to go that route.
Note: if the original copy of the material is left behind in the node editor after converting it to a submaterial, do not delete it - it will delete your original material as well. Just refresh the window by clicking on a different material and clicking back on your composite material and it should just go away on its own. (last tested on 2020.2) Also, submaterials in C4D do not support material layers at this time, so you’ll have to choose between a layered material and a composite material.
Then proceed to create or bring in masks and set the material up by stacking submaterials up and setting up masks to tell Octane how the final material should look.

Material Layer Level
By now we know that a Material has a set of channels, and we also know that there’s an order of operations. If we look at the Universal Material, we can see that the Metallic Channel sits below the Specular channel in the list, meaning if Metallic is set to 1, it will completely override any contribution of the Specular channel.
What if you want the Specular channel on top of the Metallic so it's like a clear coat? You could do this in the Coating channel, but then let's say you want another metallic decal on top of the clear coat. Now you have to mask out that area so the metal goes through it, and do some creative masking in the other channels to get a different IOR or anisotropy pattern and bump in the decal section. Then if you want a different coating for just the label, and then maybe some condensation on top of that, the masking can get really tedious. For complex materials like this, the Material Layer system becomes your friend.
A Material Layer is a broken-out set of channels that can stack on top of one another and affect the layers further down the stack in a physically accurate way, rather than just overriding them or doing a murky opacity blend like in the Mix or Composite materials.
The layers are based on the standard Octane materials (Diffuse, Specular, Metallic), and then there’s a Sheen one as well which is found in the Universal Material which has a fresnel effect. There’s no Glossy Layer, but you can construct that by stacking a specular layer on top of a Diffuse Layer.
Material Layers must exist within a material - they can’t just be applied to a mesh directly. The layers can either pipe into the Layered Material, or into the Material Layer input in a standard Octane Material. In some DCCs, you may have to enable the Material Layer to get the input to run a Material Layer into.
One thing to be aware of is that there’s no emissive channel in any of the Material Layers. The base layer can be emissive, and as long as your Material Layers don’t completely cover it up, you can still get some of that showing through. A workaround to this is that you can actually run your Layered Material into a Mix or Composite Material, and then just mix it with another emissive material if, say, you want a few little lights on top of your layered material.


Layered Material
The Layered Material has an input for a base material - this can be any standard Octane material in Octane Standalone.
Up to eight layer inputs can then be added which will sit on top of the base material. Like the Mix Texture and Mix/Composite materials, these Material Layers can either be embedded or added and linked externally. Also like those other systems, embedding has the same advantages and disadvantages - keeping the node graph neat vs flexibility of reusing layers and attached textures.
If you need more than eight layers, you can add a Layer Group node to one of the layer inputs. This will give you up to eight more slots for layers, so you can have a ton of layers in batches of eight if needed.
A Layered Material is useful if you want to audition and quickly swap out and try different combinations of base materials in addition to different layers. It’s great for people who like to experiment with different looks until they find one they like.
In Cinema 4D, there are a few things that work differently than in Standalone. If you’re using a Layered Material, the Base Layer material must be a sub-material, not a standard material. This can be created in the Node Inspector for the Layered material by hitting “Add material”, or by dragging in a material from the material manager, right-clicking and choosing “convert to sub_material (some rework may need to be done).
Material Layers in a Standard Octane Material
Material Layers can also be added to a standard material type, like the Glossy, Metallic or Universal Material. This works similarly to the Layered Material, only the material itself is now the base material. There is also only one Material Layer slot in any standard octane material, so if you want more than one layer, you have to fill that with a Layer Group node, and then route all your other material Layer nodes (or more groups if you need more) into that Layer Group.
This setup is good if you have a Material you already like and just want to quickly put a label or something on top of it.
In Cinema 4D, if you want to use a standard material (diffuse, specular, universal, etc) with a Material Layer, you’ll need to enable the Material Layer in the Basic tab first.
Universal Material
It’s worth noting here that the Universal Material has a Sheen and Coating layer built in already, so if you only need a single specular or sheen coat over the whole material, you can convert your material to Universal and not have to bother with Material layers.
Wrap up
That was a lot of heady stuff to cover, but remember, you can always use this as a reference and come back here when you get stuck. In the meantime, if you haven’t already, check out the two stepthroughs to see all these concepts in action!


